해당 포스팅은 이전에 들은 강의를 토대로 핵심을 정리.
React Context API (리액트 내장 API)
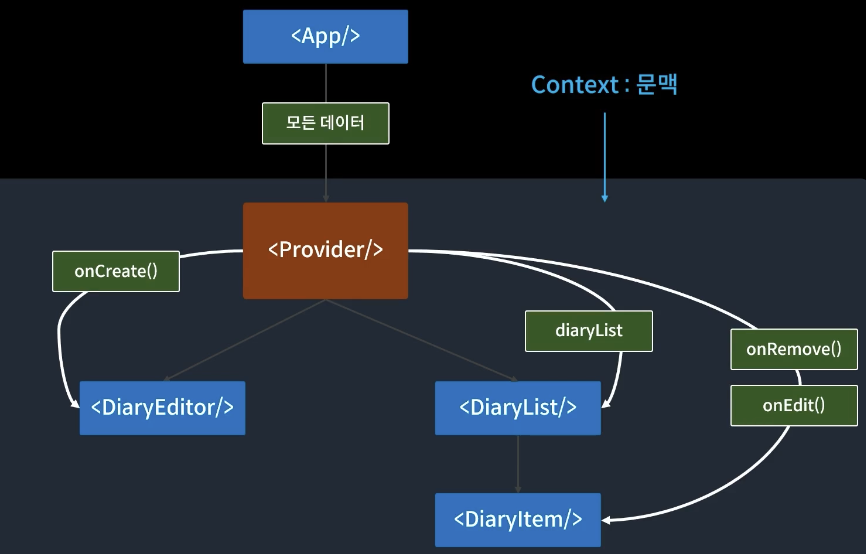
컴포넌트 트리 전체를 대상으로 데이터를 공급하는 기능 provider 사용
일반적으로 props을 통해 컴포넌트 간에 데이터를 전달하지만, 컴포넌트 간에 깊은 중첩이 있는 경우 데이터를 전달하기 번거로워 진다.
이때 useContext를 사용하면 중첩된 컴포넌트 간에 데이터를 쉽게 공유할 수 있다.
import React, { createContext, useContext } from 'react';

// 컨텍스트 생성
const UserContext = createContext();

export function UserProvider({ children }) {
  const user = { username: 'exampleUser' };

  return (
    <UserContext.Provider value={user}>
      {children}
    </UserContext.Provider>
  );
}
이제 UserProvider로 감싼 컴포넌트 내에서 useContext를 사용하여 전역적인 user 상태를 가져올 수 있다.
function UserProfile() { //컨텐스트 사용하기
  const user = useContext(UserContext);

  return (
    <div>
      <p>Username: {user.username}</p>
    </div>
  );
}
UserProvider 컴포넌트는 UserContext.Provider로 감싸져 있으며,
UserProvider 내에서 정의한 user 상태를 하위 컴포넌트인 UserProfile에서 useContext를 사용하여 가져와 사용한다.
이렇게 하면 중첩된 컴포넌트 간에 데이터를 편리하게 공유할 수 있다.
다른 React Context API예시
React Context API는 React에서 상태를 공유하는 방법을 제공하는 API이다.
Context API를 사용하면 부모 컴포넌트에서 상태를 생성하고, 자식 컴포넌트에서 상태를 사용할 수 있다.
React.createContext() 함수는 Context 객체를 생성하고, Context의 Provider와 Consumer를 반환한다.
Context의 Provider는 Context를 제공하는 컴포넌트이다.
Provider는 context={context} 속성을 사용하여 Context를 제공한다.
Context의 Consumer는 Context에서 상태를 가져오는 컴포넌트( children,아래에서는 Home)이다.
Consumer는 {useContext(context)} 훅을 사용하여 Context에서 상태를 가져온다.
const ThemeContext = React.createContext(null);

const App = () => {
  const [theme, setTheme] = useState("light");

  return (
    <ThemeContext.Provider value={{ theme, setTheme }}>
      <Home />
    </ThemeContext.Provider>
  );
};

const Home = () => {
  const { theme, setTheme } = useContext(ThemeContext);

  return (
    <div>
      <h1>Hello, world!</h1>
      <button onClick={() => setTheme("dark")}>
        Change theme to dark
      </button>
    </div>
  );
};
ThemeContext라는 Context를 생성하고, App 컴포넌트에서 ThemeContext를 제공한다.
Home 컴포넌트는 ThemeContext에서 theme 상태를 가져오고, setTheme 함수를 사용하여 theme 상태를 변경한다.
Context API는 React에서 상태를 공유하는 방법을 제공하는 강력한 API이다.
Context API를 사용하면 상태를 부모 컴포넌트와 자식 컴포넌트 간에 쉽게 공유할 수 있다.
커스텀 훅과 React Context API 활용 예제
리액트 Context API는 컴포넌트 트리 전체에서 전역적으로 데이터를 공유하고 전달하는 방법을 제공하는 리액트의 기능이다.
Context를 사용하면 중간 컴포넌트를 거치지 않고 데이터를 직접 전달할 수 있어서 컴포넌트 간의 데이터 공유가 간단해진다.
Context 생성하기 (UserContext.js):
import React, { createContext, useContext, useState } from 'react';

// Context 객체 생성
const UserContext = createContext();

// Context Provider 컴포넌트 생성
export function UserProvider({ children }) {
  const [user, setUser] = useState(null);

  return (
    <UserContext.Provider value={{ user, setUser }}>
      {children}
    </UserContext.Provider>
  );
}

// Custom Hook 생성
export function useUser() {
  return useContext(UserContext);
}
UserContext는 Context 객체를 생성하고, UserProvider는 해당 Context의 값을 제공하는 Provider 컴포넌트를 생성한다.
useUser는 해당 Context의 값을 사용하기 위한 커스텀 훅을 생성한다.
Context 사용하기 (App.js):
import React from 'react';
import { UserProvider } from './UserContext';
import UserProfile from './UserProfile';

function App() {
  return (
    <UserProvider>
      <div>
        <h1>App</h1>
        <UserProfile />
      </div>
    </UserProvider>
  );
}

export default App;
컨슈머 컴포넌트 생성하기 (UserProfile.js):
import React from 'react';
import { useUser } from './UserContext';

function UserProfile() {
  const { user, setUser } = useUser();

  const handleLogin = () => {
    setUser({ name: 'John' });
  };

  const handleLogout = () => {
    setUser(null);
  };

  return (
    <div>
      {user ? (
        <div>
          <p>Welcome, {user.name}!</p>
          <button onClick={handleLogout}>Logout</button>
        </div>
      ) : (
        <div>
          <p>Please login</p>
          <button onClick={handleLogin}>Login</button>
        </div>
      )}
    </div>
  );
}

export default UserProfile;
UserProfile 컴포넌트에서 useUser 훅(커스텀)을 사용하여 user 상태와 setUser 함수를 받아온다.
이를 통해 사용자 정보를 로그인 및 로그아웃 버튼으로 관리할 수 있다.
Context API를 사용하면 컴포넌트 간에 데이터를 손쉽게 공유하고 전달할 수 있다.
위의 예시에서는 사용자 정보를 컨텍스트로 관리하며, UserProvider를 통해 컴포넌트 트리 전체에서 해당 정보를 사용할 수 있게 되었다.
useReducer (리액트 내장 훅)
const [state, dispatch] = useReducer(reducer, initialState);
복잡한 상태 관리 로직을 컴포넌트 바깥으로 분리하고, 상태를 업데이트하는 로직을 한 곳에서 관리할 수 있다.
useState와 비슷한 역할을 하지만, useReducer은 업데이트하는 로직을 컴포넌트 내부에 넣지 않고
외부에 둘 수 있어서 더 복잡한 상태 관리 시나리오를 처리하기에 유용하다.
useReducer는 상태(intialState)와 상태를 변경하는 함수(reducer)를 받아 상태(state)와 업데이트 함수(dispatch)를 반환한다.
상태 변경은 이 함수(distpatch)를 호출하여 수행된다.
import React, { useReducer } from 'react';

const initialState = { count: 0 };

// 리듀서 함수
const reducer = (state, action) => {
  switch (action.type) {
    case 'INCREMENT':
      return { count: state.count + 1 };
    case 'DECREMENT':
      return { count: state.count - 1 };
    default:
      return state;
  }
};

function Counter() {
  const [state, dispatch] = useReducer(reducer, initialState);

  return (
    <div>
      <p>Count: {state.count}</p>
      <button onClick={() => dispatch({ type: 'INCREMENT' })}>Increment</button>
      <button onClick={() => dispatch({ type: 'DECREMENT' })}>Decrement</button>
    </div>
  );
}

export default Counter;useReducer를 사용하여 상태(state)와 상태를 변경하는 dispatch 함수를 생성한다.
reducer 함수는 상태와 액션을 받아 새로운 상태를 반환한다.
dispatch 함수를 호출할 때마다 현재 state와 reducer함수가 참조하며
reducer 함수에 정의된 로직에 따라 상태가 변경되며, 이로 인해 컴포넌트가 다시 렌더링된다.
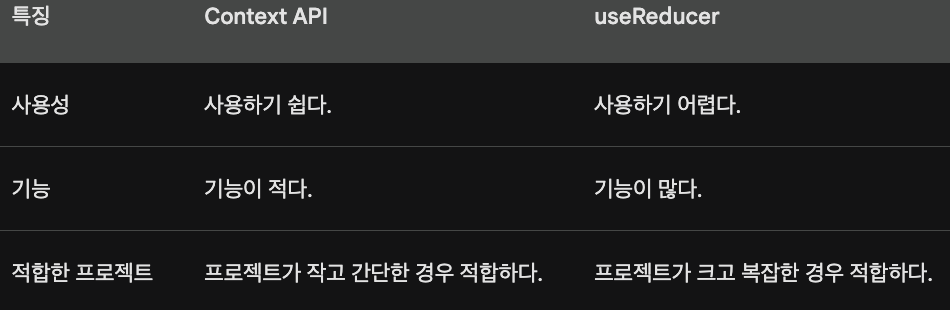
useContext과 useReducer
useContext와 useReducer는 둘 다 리액트 훅이지만, 다른 목적과 사용 사례를 가지고 있다.
useContext
useContext는 컴포넌트 트리에서 상태나 함수를 전역적으로 공유하기 위해 사용된다.
여러 컴포넌트 간에 공통적인 데이터를 전달하기 위해 사용된다.
사용 목적: 데이터 전달 및 공유, 전역적인 설정 또는 상태 공유.
예시: 사용자 정보, 테마 설정, 인증 상태 등을 여러 컴포넌트에서 공유하고 싶을 때 사용한다.
사용 사례: UserContext, ThemeContext와 같이 공통 데이터나 설정을 관리하는 데 사용됩니다.
useReducer
useReducer는 복잡한 상태 관리 로직을 분리하고, 액션에 따라 상태를 업데이트하는 데 사용된다.
보통 복잡한 컴포넌트에서 사용자의 액션에 따라 상태를 변경하는데 유용하다.
사용 목적: 복잡한 상태 관리, 상태 변경 로직 분리.
예시: 컴포넌트의 로직이 복잡하여 여러 액션과 상태 변화를 다루어야 할 때 사용한다.
사용 사례: 계산기 앱, 할일 목록 등 복잡한 상태 변화를 다루는 데 사용됩니다.
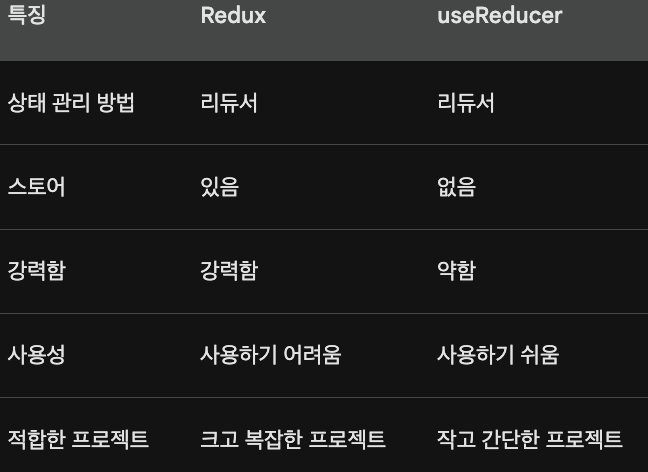
비교 요약
useContext는 컴포넌트 간 데이터 전달 및 공유에 사용되며, 전역적인 설정이나 상태를 공유하기 위한 용도.
useReducer는 복잡한 상태 관리와 상태 변경 로직의 분리에 사용되며, 여러 액션과 상태 변화를 다룰 때 유용.
하지만 useContext과 커스텀훅을 사용하면 useReducer역활을 할 수 있다.
즉, useReducer의 기능이 더 많다는 뜻.
Context API로 상태관리를 하고 유지보수를 하며 rudux까지 확장을 할지 정해 보자 !
Redux
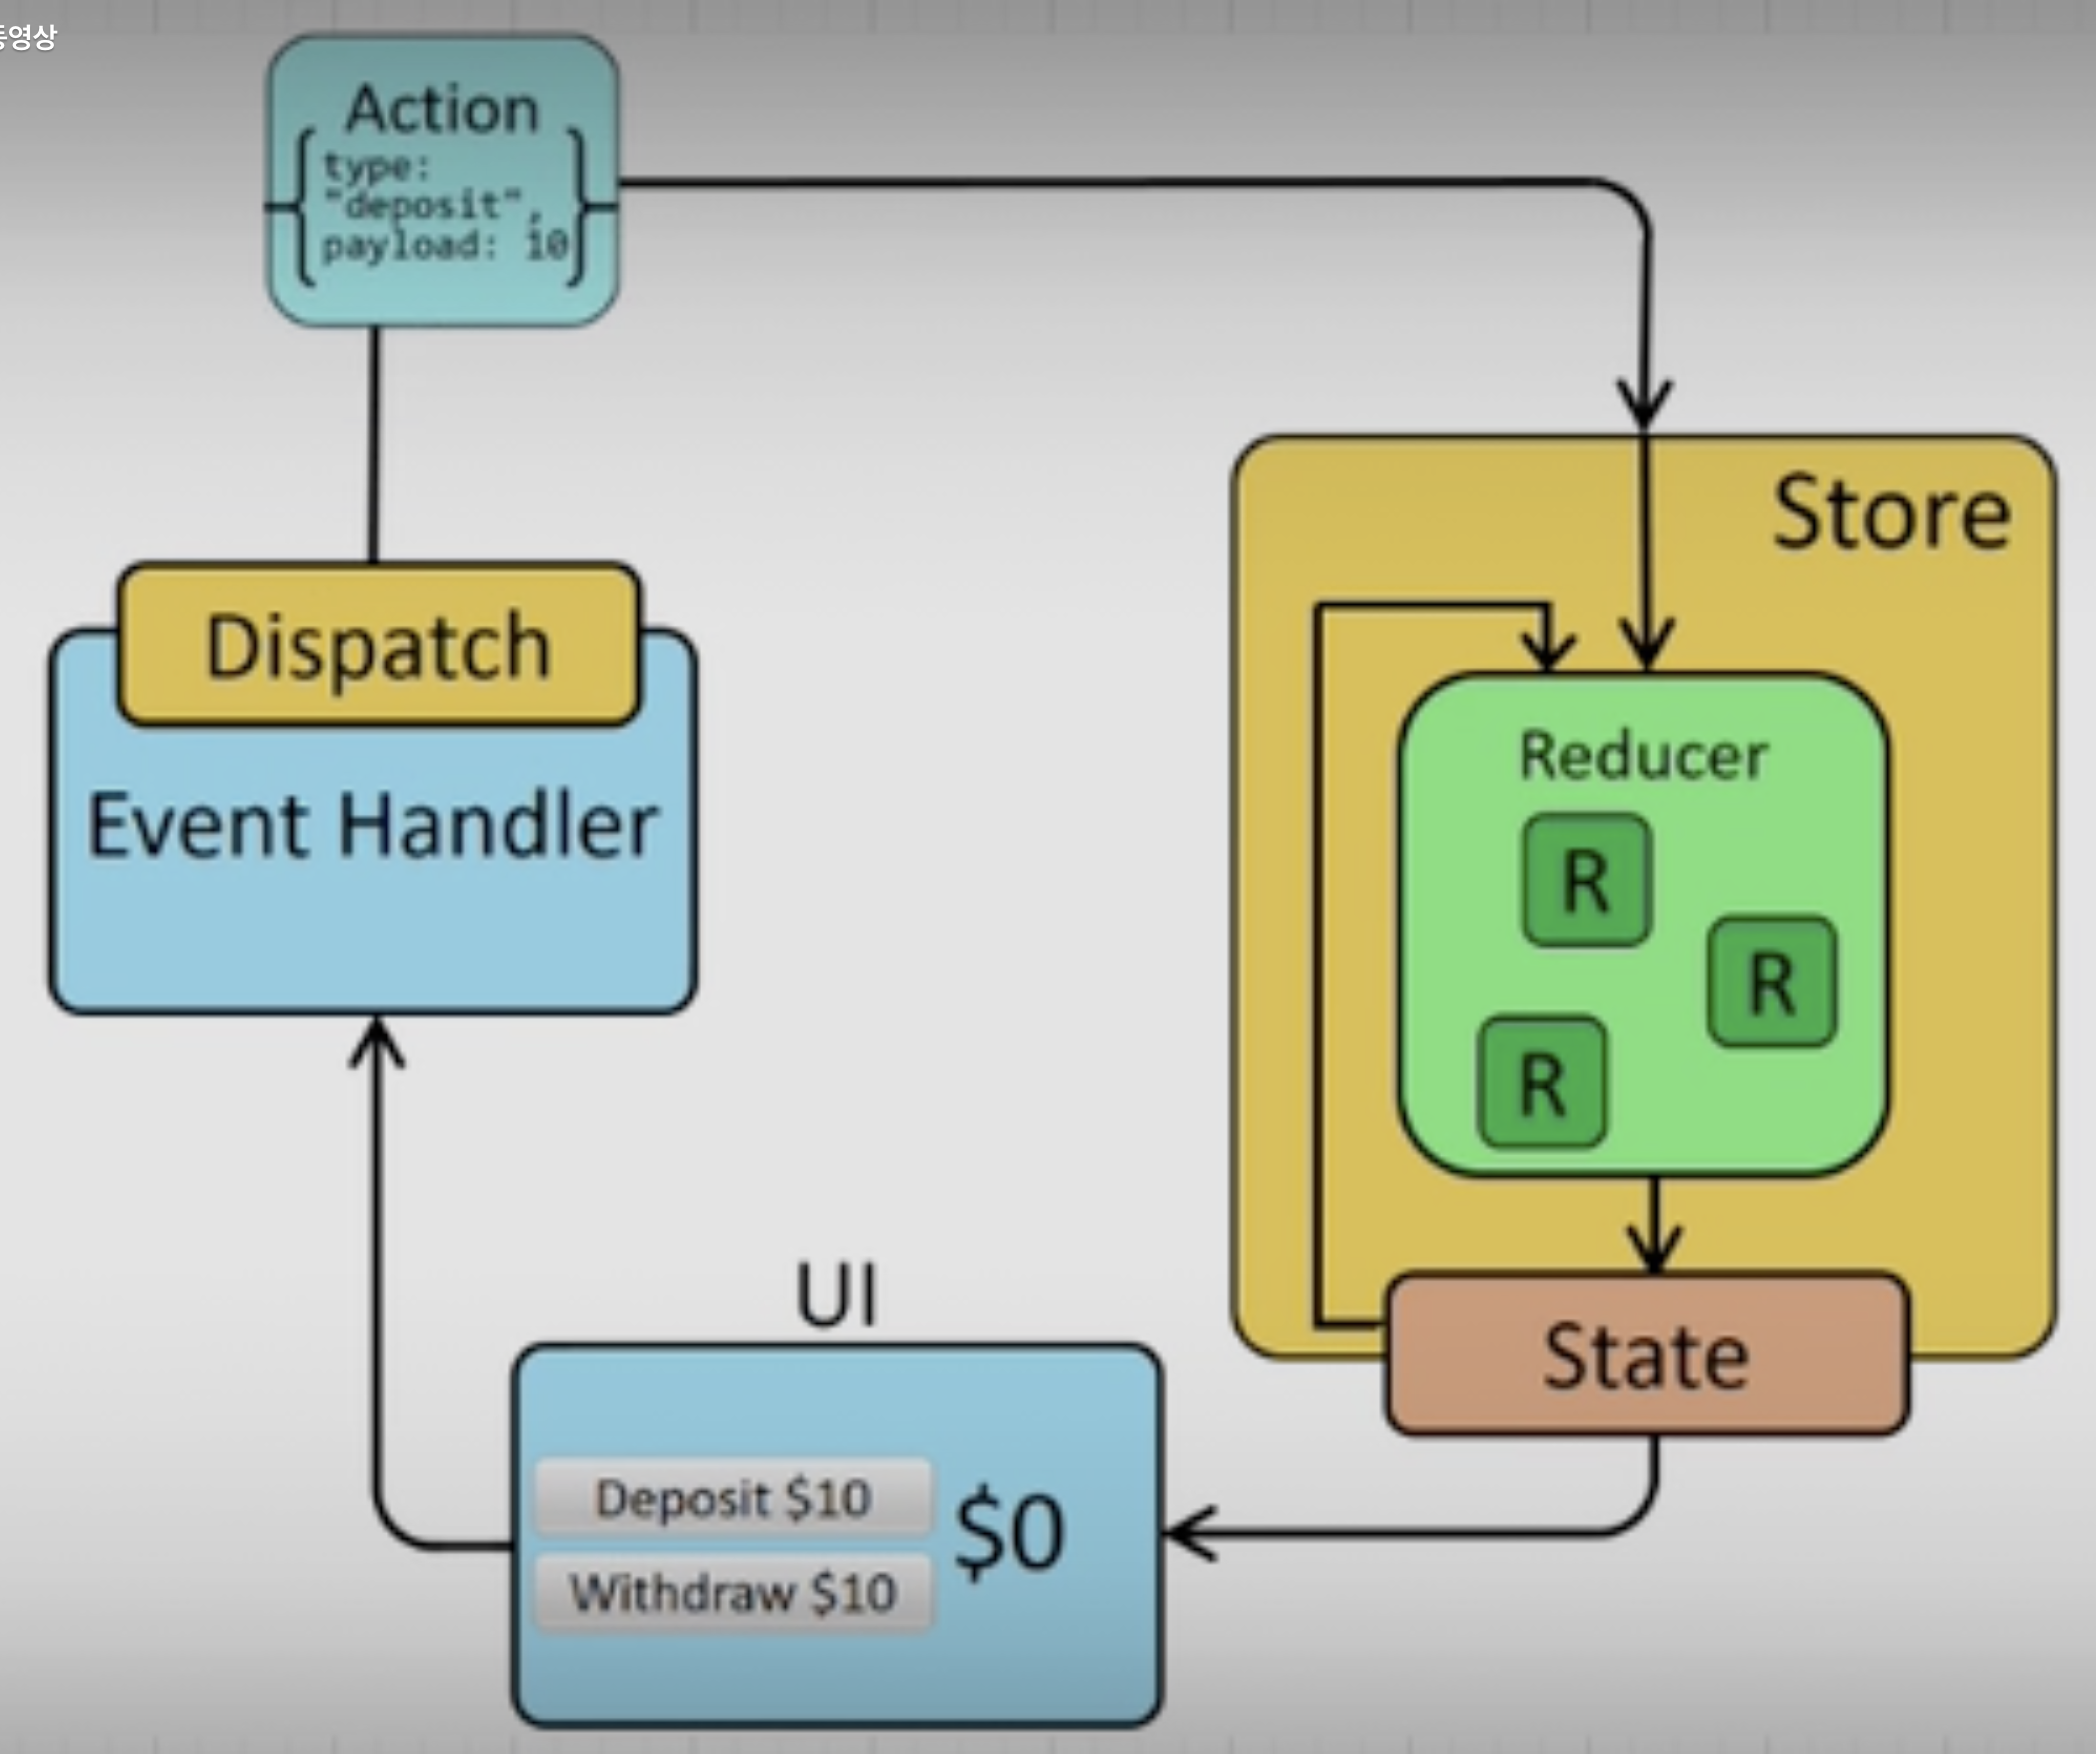
액션(Action), 상태(State), 리듀서(Reducer)의 개념을 기반으로 작동
const ADD_TODO = 'ADD_TODO'; // 액션(Action): 상태 변경을 위한 동작을 정의하는 객체

const addTodoAction = (text) => {
  return {
    type: ADD_TODO,
    payload: {
      text
    }
  };
};
.
const initialState = {       //상태(State): 애플리케이션의 전체 상태를 포함하는 객체
  todos: []
};
.
const todosReducer = (state = initialState, action) => {
  switch (action.type) {  // 리듀서(Reducer): 액션을 기반으로 현재 상태를 변경하는 함수
    case ADD_TODO:
      return {
        ...state,
        todos: [...state.todos, action.payload]
      };
    default:
      return state;
  }
};
.
import { createStore } from 'redux';//Redux 스토어 생성 및 연결

const store = createStore(todosReducer);
.
import { useSelector, useDispatch } from 'react-redux'; //컴포넌트에서 Redux 사용

const TodoList = () => {
  const todos = useSelector(state => state.todos);
  const dispatch = useDispatch();

  const addTodo = (text) => {
    const action = addTodoAction(text);
    dispatch(action);
  };

  return (
    <div>
      <ul>
        {todos.map((todo, index) => (
          <li key={index}>{todo.text}</li>
        ))}
      </ul>
      <button onClick={() => addTodo('New Todo')}>Add Todo</button>
    </div>
  );
};
션을 통해 상태 변경을 요청하고, 리듀서에서 실제 상태를 변경하며,
useSelector와 useDispatch 훅을 사용하여 컴포넌트에서 Redux 상태와 동작을 활용하고 있다
'모카 스터디 > React' 카테고리의 다른 글
| 리액트 성능 최적화 Hook 개념정리 (0) | 2023.08.07 |
|---|---|
| 리액트 데이터 패칭 라이브러리 개념 정리 및 비교 (React Query,SWR,Redux-sagas,thunk) (0) | 2023.08.07 |
| 리액트 기본 Hook 개념정리 (0) | 2023.08.07 |
| 리액트 기본 개념 정리 (0) | 2023.08.07 |
| 따라하며 배우는 리액트 A-Z -도커를 이용한 리액트 실행 - [John Ahn] (0) | 2023.07.23 |

